Fortigate ZTNA Setup (HTTPS Proxy)
Prerequest
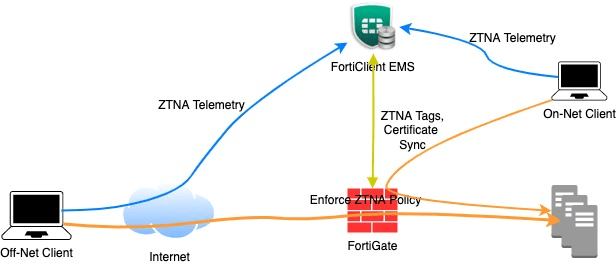
ZTNA has three components to work to together – Fortigate, FortiEMS and FortiClient, hence the following jobs must be done:
- Enable ZTNA feature on FortiGate, and setup EMS connector
- Install FortiClient and connect to FortiEMS, moreover, verify that tags synchronizely appear in both FortiEMS and FortiClient.
My Platform
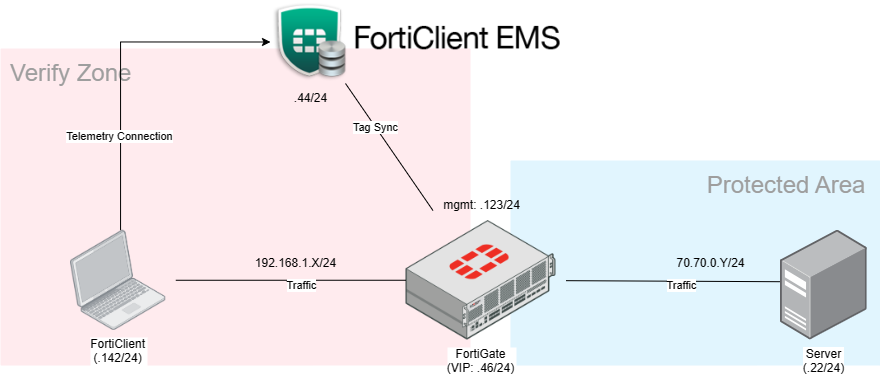
In my lab, I manage to seperate 3 components into different nodes, I mean physically separated. This allows for clear packet inspection and helps prevent network environment clutter. Occasionally, most issues that I encounter about uncertain behavior of the Device Under Test (DUT), often lead to the messed network environment where source and destination of packets is unclear.
- FortiGate using physical FortiGate 101F v7.0.13
- FortiEMS using VM deploy on A server, v7.2.3
- FortiClient using VM deploy on B server, v
Setting ZTNA access proxy for HTTP(S)
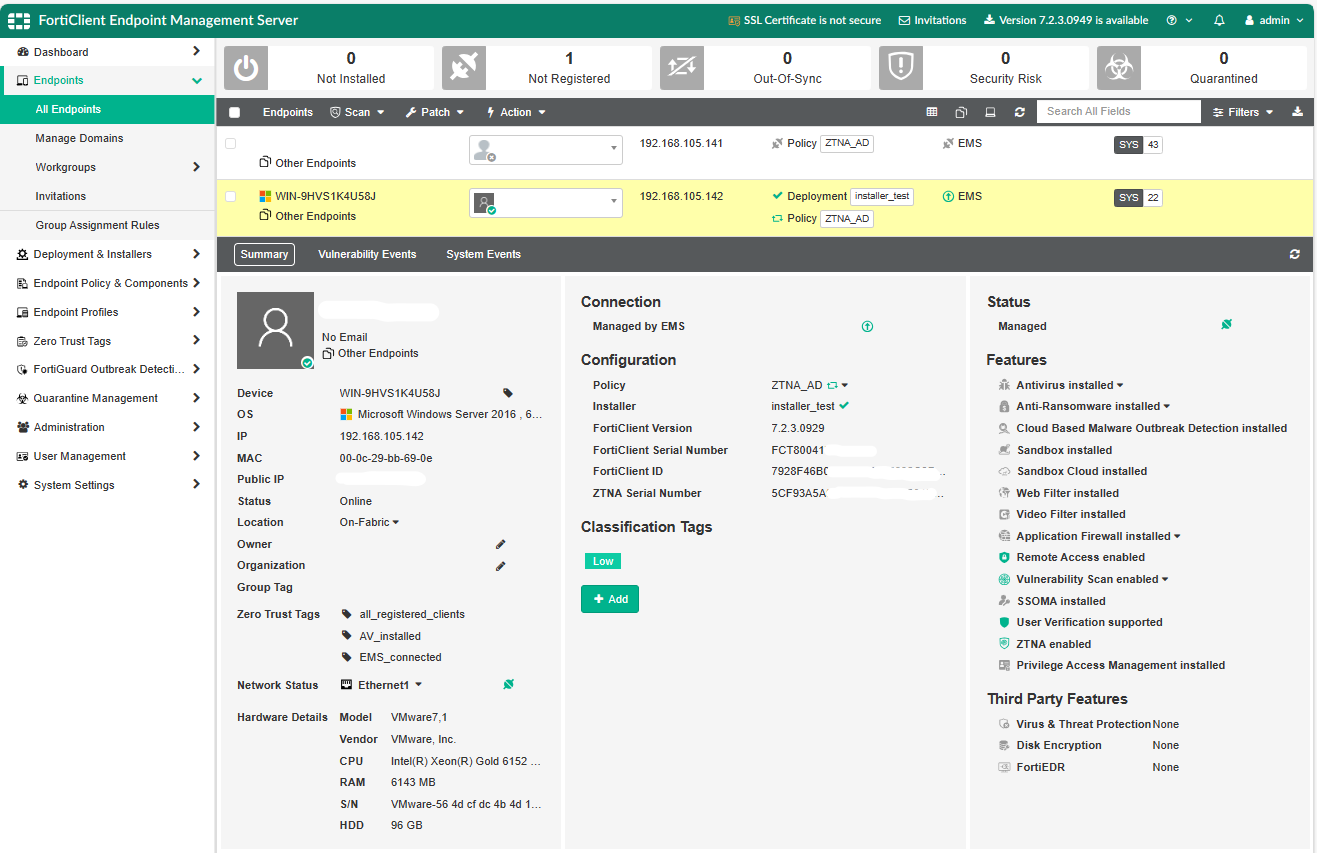
Step0. Comfirm your FortiGate has tags and address info from FortiEMS
EMS Endpoint general view.
FortiGate ZTNA tags and each associated dynamic addresses.
1
2
3
4
5
6
7
8
9
10
11
12
13
14
15
16
# diagnose firewall dynamic address
List all dynamic addresses:
IP dynamic addresses in VDOM hungju_test(vfid: 1):
CMDB name: EMS1_ZTNA_AV_installed
TAG name: AV_installed
EMS1_ZTNA_AV_installed: ID(44)
    ADDR(192.168.105.142)
Total IP dynamic range blocks: 0.
Total IP dynamic addresses: 1.


CMDB name: EMS1_ZTNA_OS_latest
TAG name: OS_latest
EMS1_ZTNA_OS_latest: ID(7)
Total IP dynamic range blocks: 0.
Total IP dynamic addresses: 0.
Step1. Configure HTTPS Access Proxy for ZTNA
Asume that you already have dynamic firewall addresses that ztna tags resolved to, now it’s time for configure proxy and VIP to handle https requests. Go to Policy & Objects > ZTNA > ZTNA Server and create new ZTNA server, or proxy whatever you name it. The objective of seting up proxy and give a VIP is to make traffic establish connection on both client and server sides. A significant advantage of using proxy rather than routing or forwarding network architecture is its capability to actively terminate connection simply by sending the TCP RST packet. This feature allows for granular application of various scenario, such as security verification.
In client side, our hosts can (only?) establish https connection to proxy.
1
2
3
4
5
6
7
8
9
10
11
12
13
14
15
16
17
18
config firewall vip
    edit "ZTNA_WebServer"
        set type access-proxy
        set extip 192.168.105.46
        set extintf "port12"
        set server-type https
        set extport 8443
        set ssl-certificate "Fortinet_SSL"
    next
    edit "ZTNA_TCP_Forward"
        set type access-proxy
        set extip 192.168.105.45
        set extintf "port12"
        set server-type https
        set extport 8443
        set ssl-certificate "Fortinet_SSL"
    next
end

It will be better to use you own SSL certificat, however we don’t bother but use Fortinet factory certificate and defaut inspection profile.
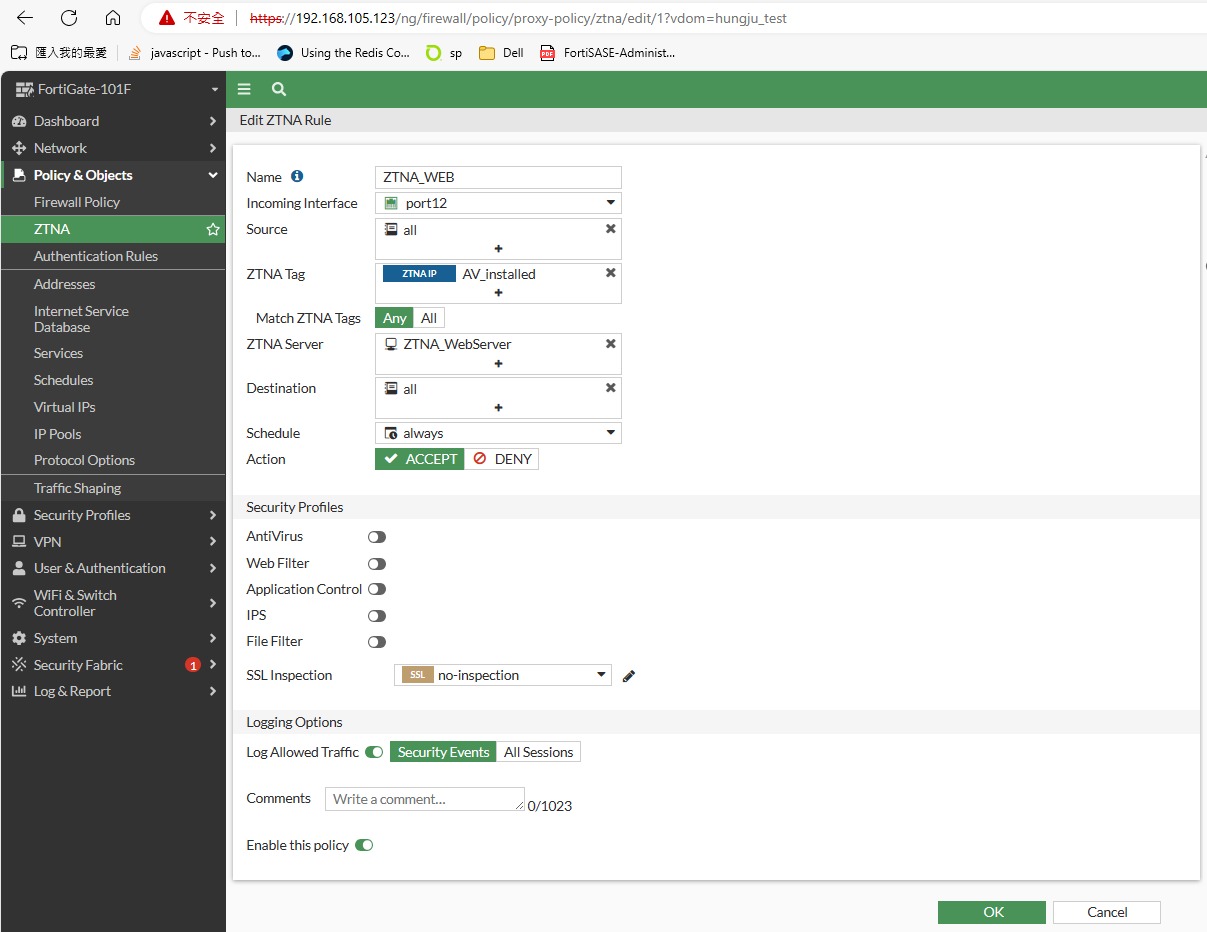
Step2. Configure Firewall Proxy Policies
These Proxy Policy is firewall policy alike. Require you to define source and destination addresses, services, actions and more – ZTNA tags.
1
2
3
4
5
6
7
8
9
10
11
12
13
14
15
16
17
18
19
20
21
22
23
24
25
config firewall proxy-policy
    edit 1
        set uuid 897d7aba-bfff-51ee-fd08-73735387a6f2
        set name "ZTNA_WEB"
        set proxy access-proxy
        set access-proxy "ZTNA_WebServer"
        set srcintf "port12"
        set srcaddr "all"
        set dstaddr "all"
        set ztna-ems-tag "EMS1_ZTNA_AV_installed"
        set action accept
        set schedule "always"
    next
    edit 2
        set uuid b80bf4fc-c0c6-51ee-9458-daf21a8925db
        set name "ZTNA_RDP"
        set proxy access-proxy
        set access-proxy "ZTNA_TCP_Forward"
        set srcintf "port12"
        set srcaddr "all"
        set dstaddr "all"
        set action accept
        set schedule "always"
    next
end

Verify the Result
On FortiClient host, we can inspect the tags we belong to, as long as Show Zero Trust Tag on FortiClient GUI option is enabled on FortiEMS Endpoint profile. In this case, we are under rules of AV_installed and EMS_connected, which was previously mentioned in post FortiEMS Setup.
![]()
Authorized End User for Fortigate
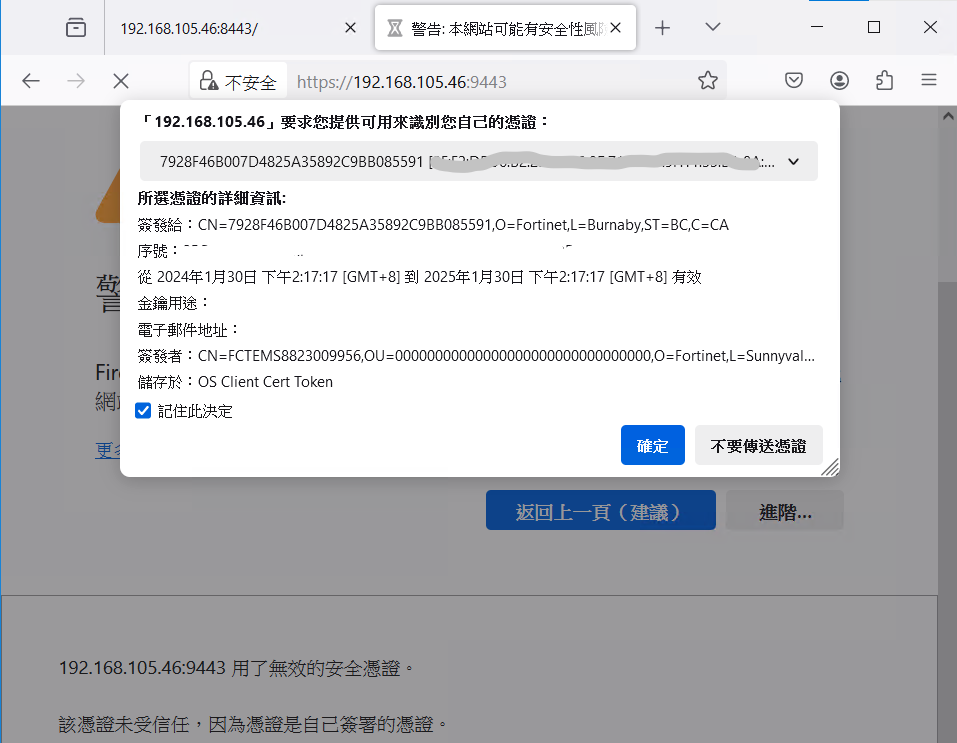
Upon initial access to the proxy, a pop-up message prompts us to confirm whether to utilize the certificate issued by FortiEMS beforehand to connect to proxy. More specific, we obtained this certificate while installing the FortiClient packet. This certificate serves as our credential in the TLS connection between FortiClient and FortiGate, the connection commonly reffered as a term - Secure Access.
In the following paragraph, we will verify how ZTNA validates users and the results through functional testing. As observed, our FortiClient is categorized under the EMS_connected and AV_installed categories by ZTNA tags. For further description, two test cases based on same firewall policy with different ztna tags, one is AV_installed and the other is OS_latest, corrsponding with the valid user and invalid user.
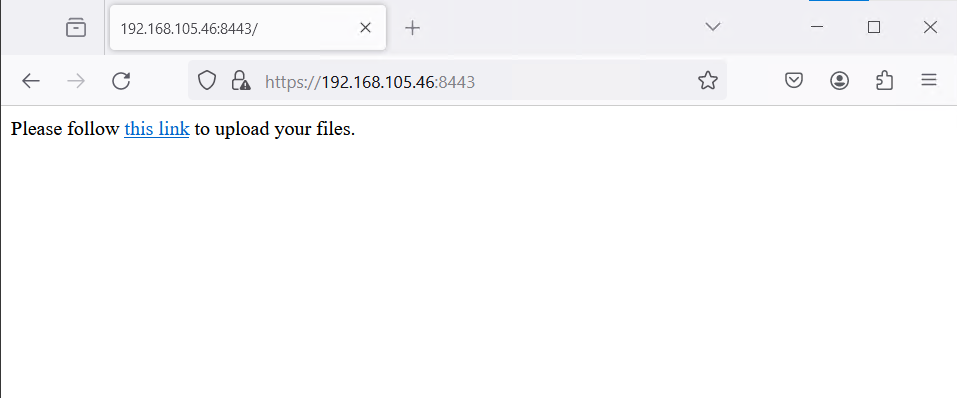
Valid User
Test case 1, we apply rules to only allow traffic from whose tag with AntiVirus Installed. Then open the browser to visit HTTP proxy. We can see the IIS default page which means it works.
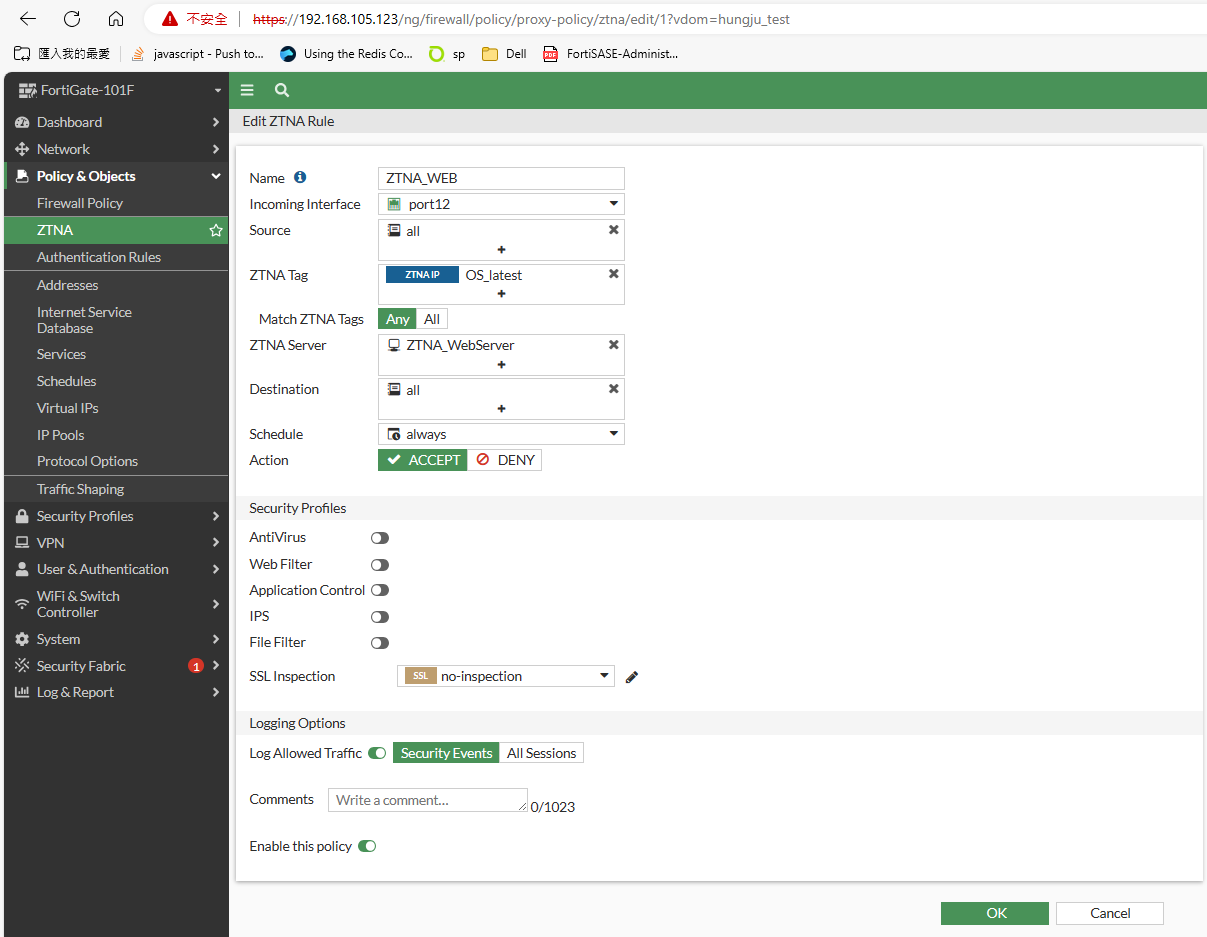
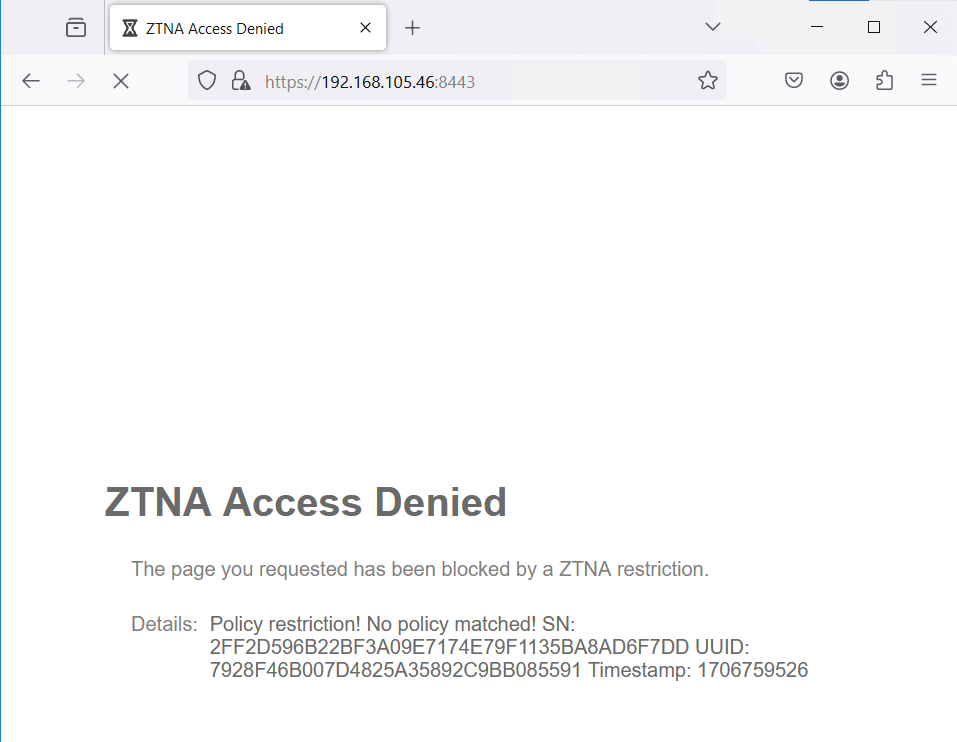
Invalid User
Test case 2, we change rules to only allow traffic from whose OS version is latest. This time we are not allowed to access IIS default page anymore, it also indicate the ZTNA works fine.
Other functionality, like TCP forwarding
Other than HTTP Access Proxy with ZTNA, we barely success to make TCP forwarding proxy to function properly, as it fails to transfer TCP traffic from HTTPs to other TCP protocols.
